
Macarons are a delicious sweet treat, that we and may other people can't get enough of. I decided to try my hand at some homemade macarons as I had come across many recipes online that promised an easy method with exceptional results. In preparation for this recipe I decided to buy a Macaron making kit from Amazon.

Continue reading to see how it went.

1 Cup of Ground Almonds/Almond Flour
2 Cups of Icing Sugar
1/4 Cup of Granulated Sugar
3 Egg Whites (room temperature)
Nutella (or filling of your choice)
Gel Food colouring (of your choice.)
Method:
Separate the egg whites from the yolk, making sure to not get any bits of shell or yolk in the whites.


Whilst the egg whites and sugar are being whisked add in the food colouring of your choice. Make sure to add more colour than you think you need as the colour fades during baking. You should take this time to sift the Almond flour and Icing sugar in a separate bowl. Make sure the Almonds and Icing sugar are sifted well to avoid a lumpy mixture.
After 10 minutes the whites should start to hold their shape and begin to rise. I honestly think I may have over whisked my eggs but my mixture seemed to turn out ok.

Once the egg whites are done. Sift the Icing Sugar and Almond flour again into the mixture.


The silicone mat is supposed to give you a guide so that you get macarons which are all the same size and shape. The mat, I'm a little unsure of. My macarons did turn out roughly the same shape but I didn't get why it has a smaller circle within the circle, and I think having more space between each macaroon would make the process easier.
Here is where things get a little iffy. The recipe I followed said to cook the macarons for 13-20 minutes at 125C in a fan oven. I did this and this is what happened!

After that disaster I decided to try again as I had some mixture that would not fit in the squeezy tube. This time I used a piping bag and tried to get them equal by eye.
I also just placed them on a sheet of baking paper, let my oven cool down while letting the macarons rest for 20 minutes. I put them in the oven for 5-8 minutes at 110C and this is what I got.

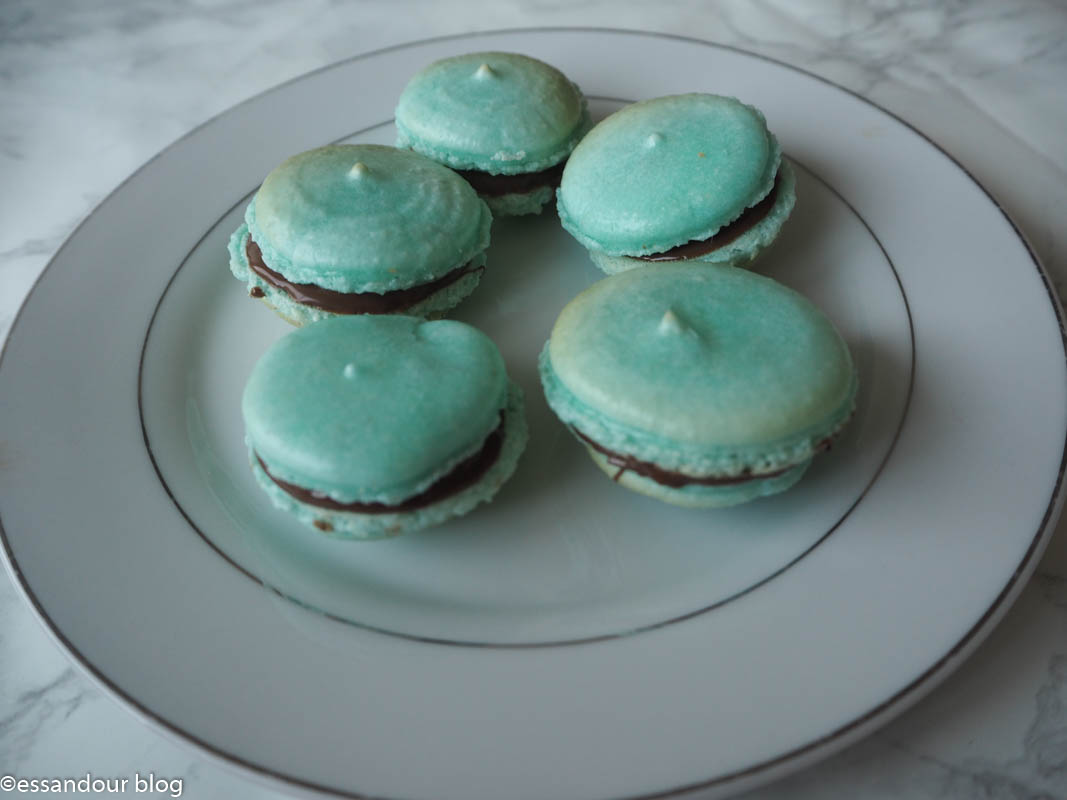
Not perfect, but better. As you can see they're a little uneven in size and started to brown a little but such a huge improvement from the first batch. I only managed to get 6 but they tasted delicious. I filled them with a little Nutella and enjoyed.

Use my own piping bag, that thing was so messy and I had so much more control with a regular piping bag.
Use a regular tray and baking paper. The Silicone mat was whatever. If i really wanted precise discs drawing them onto baking paper would be just as effective or even better.
Try to work out the timings/temperature for cooking. I baked the second batch for just over 5 minutes but they still started to catch, maybe reducing the temperature next time will be better.
All in all the second batch of macarons tasted yummy, even though they weren't as pretty as I hoped. This was a semi success and I will definitely be trying again, hopefully with better results. As for the Macaroon kit don't waste your money, a regular piping bag and baking paper will be just fine.
S.x
No comments:
Post a Comment